Quick Start
DSN or django-signal-notifier is a Django package to send message or notification based on the Django’s signals triggering. You can select some backends for each signal(e.g., An In-Site notification app).
Attention
django-signal-notifier==0.2.1 is not compatible with django>=3.1 . We are solving the problem.
Concepts (Summary version)
DSN’s architecture :
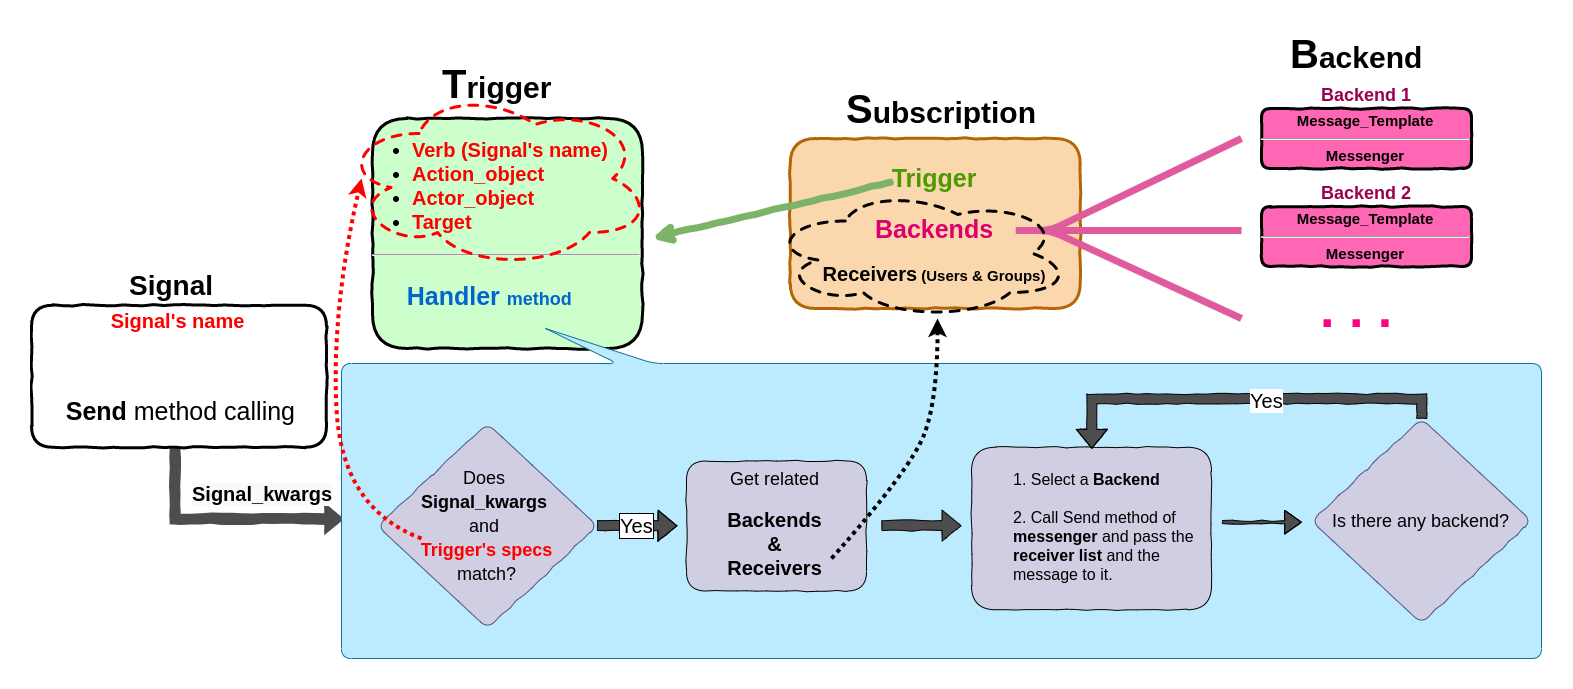
In a nutshell, we can say DSN is developed to send message :
When and Where ? : When a Trigger Triggered (The associated signal’s send function is called, and the trigger’s specs match).
What to send?: The message that is created to the message_template and other parameters like signal_kwargs.
Whom to send? : Send the message to the registered receivers in the subscription or the dynamic user that can be specified in the messenger.
Note
You should pay attention to these 3 questions when you want to assign a new trigger to a signal.
Setup
Requirements
Python 2.7, 3.4, 3.5, 3.6, 3.7
Django 1.7, 1.8, 1.9, 1.10, 1.11, 2.0, 2.1, 2.2, 3.0
Attention
django-signal-notifier==0.2.1 is not compatible with django>=3.1 . We are solving the problem.
Installation
1. Install django-signal-notifier by pip:
$ pip install django-signal-notifier
or use the source
$ git clone https://github.com/hadi2f244/django-signal-notifier
$ cd django-signal-notifier
$ python setup.py sdist
$ pip install dist/django-signal-notifier*
Add “django_signal_notifier” at the end of INSTALLED_APPS setting like this
INSTALLED_APPS = [
    'django.contrib.auth',
    'django.contrib.contenttypes',
    ...
    'django_signal_notifier',
]
Migrate
django-signal-notifierconfigure by admin panel by default(Can be configured by code, tough)Use
python manage.py migratefor schema migration.
Attention
- You may face with below error, To resolve it, ‘migrate’ first.
no such table: django_signal_notifier_trigger.
An error occurs when reconnecting trigger to the corresponding signals, Note: Make sure you migrate and migrations first
Usage
Run the development server and visit http://127.0.0.1:8000/admin/ To create a trigger(signal), backends(messenger and message_template), and subscription (you’ll need the Admin app enabled).
- You can test it like this:
5.1. Create a trigger (verb=pre_save and action_object=TestModel1)
5.2. Create a backend (messenger=SimplePrintMessengerTemplateBased and message_template=SimplePrintMessageTemplate)
5.3. Create a subscription that connects the trigger and the backend. Add admin to the receiver(user) list.
5.4. Run this command in manage.py shell:
from django_signal_notifier.models import *
TestModel1_another_instance = TestModel1.objects.create(name="new_test_model2", extra_field="extra")
Now you should see a message when you create TestModel1. By Creating new TestModel1, Django calls the pre_save signal’s send method. Then this signal call associated trigger handler. In the Trigger handler, the associated backend is called. The message_template with some details are sent to the backend. In our case, a simple message is printed. You can provide your messengers and message_templates.